Do you have a Raspberry Pi, that little computer, tucked away somewhere, perhaps running a project or doing something clever for you? Well, what if you could reach it, control it, and even check on it without being right there in front of it? It’s a pretty neat idea, isn't it? This article explores how you can make that happen, giving you the freedom to manage your small computer from just about any spot with an internet connection, making your projects a whole lot more flexible.
Getting your tiny computer to respond to your commands from a distance can seem a bit like magic, but it's really just a matter of setting things up correctly. Think about it: you could have your Pi doing important work at home while you're at the office, or maybe you're on vacation and want to quickly adjust something on a project. This capability, in a way, frees your Pi from its physical location, allowing you to interact with it as if you were sitting right beside it, which is, you know, quite handy.
This ability to reach out and touch your Raspberry Pi, even when you're far away, opens up a lot of possibilities for anyone who uses these versatile little machines. Whether you're a seasoned enthusiast or just starting out with your first Pi, knowing how to get into it from another place can make a world of difference in how you use it. We'll look at the different ways you can achieve this, making sure you feel comfortable with each step, so you can really get the most out of your small but mighty device.
Table of Contents
- What exactly is remote access for your Raspberry Pi?
- Why would you want to access your Pi remotely?
- Getting started with remote access for your Raspberry Pi
- How can you safely connect to your Raspberry Pi from afar?
- Are there other ways to access your Pi remotely?
What exactly is remote access for your Raspberry Pi?
When people talk about "remote access" for a Raspberry Pi, they're simply talking about being able to get to it and use it from another computer or device that isn't physically next to it. It's like having a special key that lets you open your Pi's front door from miles away. This means you could be sitting at a coffee shop with your laptop, and still be able to type commands into your Pi that's back at your house, or see its desktop screen, which is, you know, pretty cool. It’s about bridging the distance between you and your small computer, making it feel like it's always within arm's reach, even when it's not.
This capability is really useful for many situations. Maybe your Pi is set up in a hard-to-reach spot, like a high shelf or inside an enclosure that's a bit of a pain to open up every time you want to make a small change. Or, perhaps you have a few Pis scattered around your home or even in different places, and you want to keep an eye on them or make adjustments without having to travel to each one. So, it's essentially about convenience and control, letting you interact with your Pi's operations no matter where you happen to be at the moment, which, in some respects, simplifies things a lot.
The core idea behind this kind of distant interaction is that your Pi is connected to a network, usually your home internet, and you use another device, also connected to the internet, to send instructions to it. The magic happens through special programs and settings that create a secure channel for these instructions to travel. This channel makes sure that only you, or people you allow, can send those commands. So, it's not just about reaching it, but reaching it safely, which is a very important part of the whole setup, as a matter of fact.
Why would you want to access your Pi remotely?
There are quite a few good reasons why someone might want to get to their Raspberry Pi from a distance. One big reason is simply convenience. Imagine you've got your Pi running a weather station in your garden, and you want to check the readings or tweak how it collects data without having to go outside, especially if it's raining. Being able to do that from the comfort of your couch is a pretty nice perk, so it really makes life easier for project managers and hobbyists alike.
Another common situation involves projects that are meant to run continuously without much direct human interaction. Perhaps your Pi is serving as a small home server, storing files, or even hosting a tiny website. If something goes wrong, or if you need to upload a new file, you don't want to have to plug in a monitor and keyboard every single time. Remote access means you can fix things or add new content quickly, no matter where you are, which, you know, keeps everything running smoothly.
For those who use their Raspberry Pis for home automation, remote access is almost a must. You might have your Pi controlling your lights, your thermostat, or even your pet feeder. If you're away from home and realize you forgot to turn off the lights, or you want to adjust the heating before you get back, being able to log into your Pi from your phone or laptop is incredibly helpful. It gives you control over your home's smart features even when you're not physically there, which is a powerful feeling, in a way.
People also use remote access for learning and experimenting. If you're trying out new software or coding something on your Pi, you might want to do it from your main computer where you're already comfortable. This way, you don't have to switch between devices, and you can use your preferred tools and screen size. It makes the whole process of developing and testing much more fluid, allowing you to focus on the creative work rather than the physical setup, which is really quite beneficial.
Getting started with remote access for your Raspberry Pi
To begin the process of reaching your Raspberry Pi from a distance, there are a few fundamental things you'll need to consider. First, your Pi itself needs to be turned on and connected to a network, typically your home Wi-Fi or an Ethernet cable plugged into your router. Without a network connection, there's no path for your commands to travel from your remote device to your Pi, so that's the absolute first step, basically.
Next, you'll need to know your Raspberry Pi's network address. This is like its unique street address on your local network. It's usually a series of numbers, often called an IP address. You can find this out by plugging your Pi into a monitor and keyboard initially, and then using a command to show its network details. Knowing this address is how your other device will know where to send its requests when you want to access your Pi remotely, which is, you know, pretty essential for communication.
You'll also want to make sure your Raspberry Pi's operating system, usually Raspberry Pi OS, is up to date. Keeping it current helps ensure that all the necessary features for remote connections are working correctly and that any potential security gaps are patched up. A quick update command can take care of this, preparing your Pi for smoother distant operations, which, in fact, helps avoid many common problems down the line.
Finally, you'll need a way for your remote device to talk to your Pi. This usually involves activating specific services on your Raspberry Pi, like SSH for text-based commands or VNC for a graphical desktop view. These services act as the gatekeepers, listening for incoming connections and allowing you to interact with your Pi. We'll go into more detail about these specific methods a little later, but having them ready is key to making that distant connection work, as a matter of fact.
How can you safely connect to your Raspberry Pi from afar?
Connecting to your Raspberry Pi from a distance means you're sending information over a network, which could be the internet. Because of this, making sure your connection is safe and sound is really important. You wouldn't want just anyone to be able to get into your Pi and mess with your projects or see your private stuff. So, using methods that keep your data private and your Pi protected is a top priority, which, you know, makes a lot of sense.
The good news is that there are well-established ways to create these safe connections. These methods use special codes and techniques to scramble your information as it travels, making it very hard for unwanted eyes to see what you're doing. They also make sure that only devices you approve can even try to connect. So, while the idea of reaching your Pi from anywhere is exciting, doing it with proper safety measures in place is what truly makes it practical and worry-free, which is, honestly, the best way to go about it.
When you set up these connections, you'll typically be asked to create strong passwords, and sometimes even use extra layers of protection, like special keys. These are all part of building a solid barrier around your Pi, keeping it secure from folks who might try to snoop around. It's a bit like putting a strong lock on your front door; it gives you peace of mind knowing your valuable things are protected. We'll look at some of the most popular and secure ways to achieve this distant connection for your Pi, so you can pick the one that feels right for you.
SSH - A secure way to access your Pi remotely
SSH, which stands for Secure Shell, is a very common and highly regarded way to get into your Raspberry Pi from a distance, especially if you're comfortable using text commands. Think of it as a secure, encrypted tunnel through the internet that lets you type commands directly into your Pi's brain, no matter how far away you are. It's a powerful tool for managing your Pi without needing to see its graphical desktop, which is often all you need for many tasks, so it's a fundamental skill to pick up.
When you use SSH, all the information you send and receive is scrambled, meaning if someone were to intercept it, they wouldn't be able to make sense of it. This makes it a really good choice for keeping your Pi's operations private and safe. It's the go-to method for server administrators and anyone who needs to make quick changes or check on things without the overhead of a full graphical display, which, honestly, saves a lot of network bandwidth too.
To get SSH working, you first need to turn it on within your Raspberry Pi's settings. This is usually a simple toggle in the configuration menu or a quick command in the terminal. Once it's on, your Pi is ready to listen for incoming SSH connections. Then, from your other computer, you use a special program, often just called an SSH client, to tell it to connect to your Pi's network address. It's a straightforward process once you know the steps, and it opens up a whole new world of remote control, which is, in fact, quite liberating.
Here are some basic steps to get SSH going:
- On your Raspberry Pi:
- Open the terminal program.
- Type
sudo raspi-configand press Enter. - Go to 'Interface Options'.
- Select 'SSH' and choose 'Yes' to enable it.
- Reboot your Pi if prompted, which is, you know, a good idea to make sure changes stick.
- From another computer (like your laptop):
- If you're on a Linux or macOS machine, open your terminal. If you're on Windows, you might use a program like PuTTY, or the built-in PowerShell.
- Type
ssh pi@YOUR_PI_IP_ADDRESS(replaceYOUR_PI_IP_ADDRESSwith your Pi's actual network address, like192.168.1.100). - The first time, you might get a message about a 'fingerprint'; type 'yes' to continue.
- When asked, enter your Pi's password (the default username is 'pi' and the default password is 'raspberry', but you should really change this default for safety, as a matter of fact).
- You should now see the Pi's command line, ready for your instructions, which means you're connected!
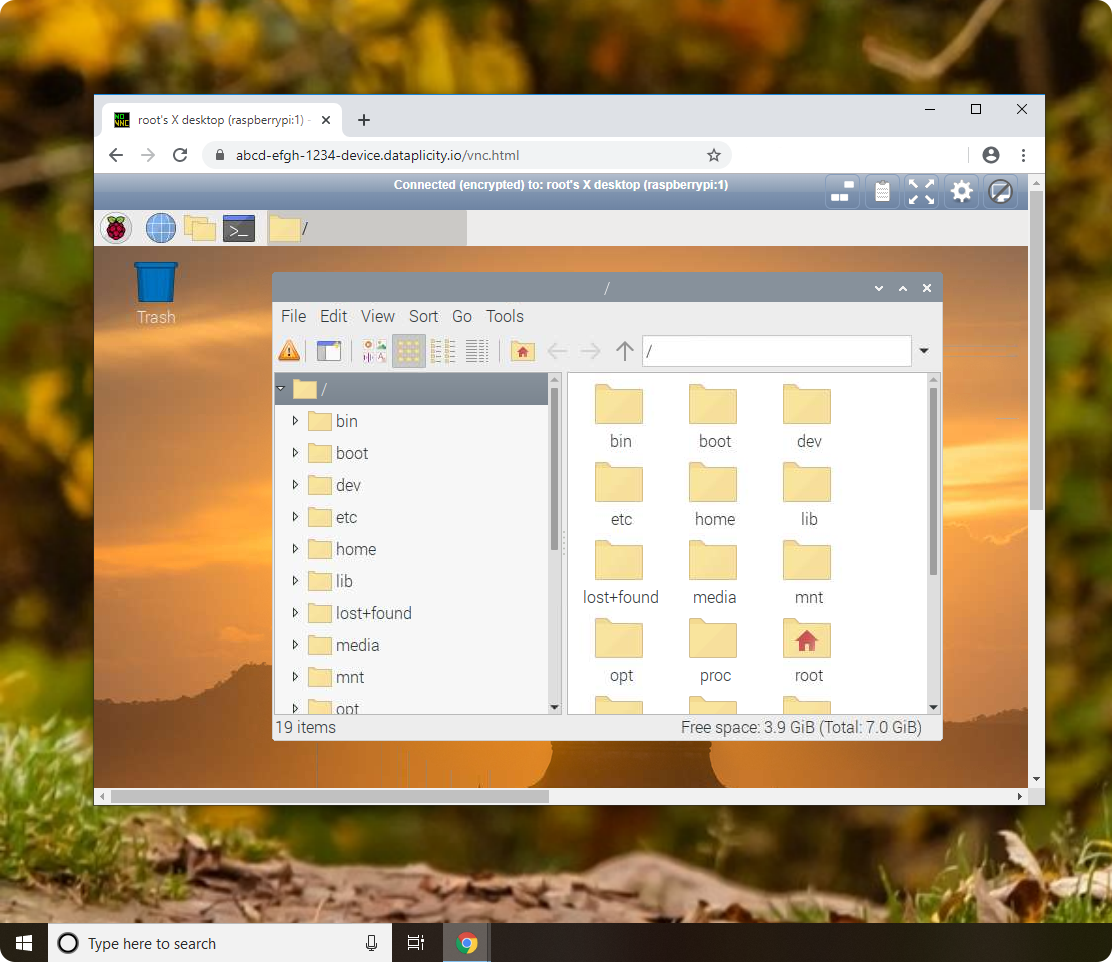
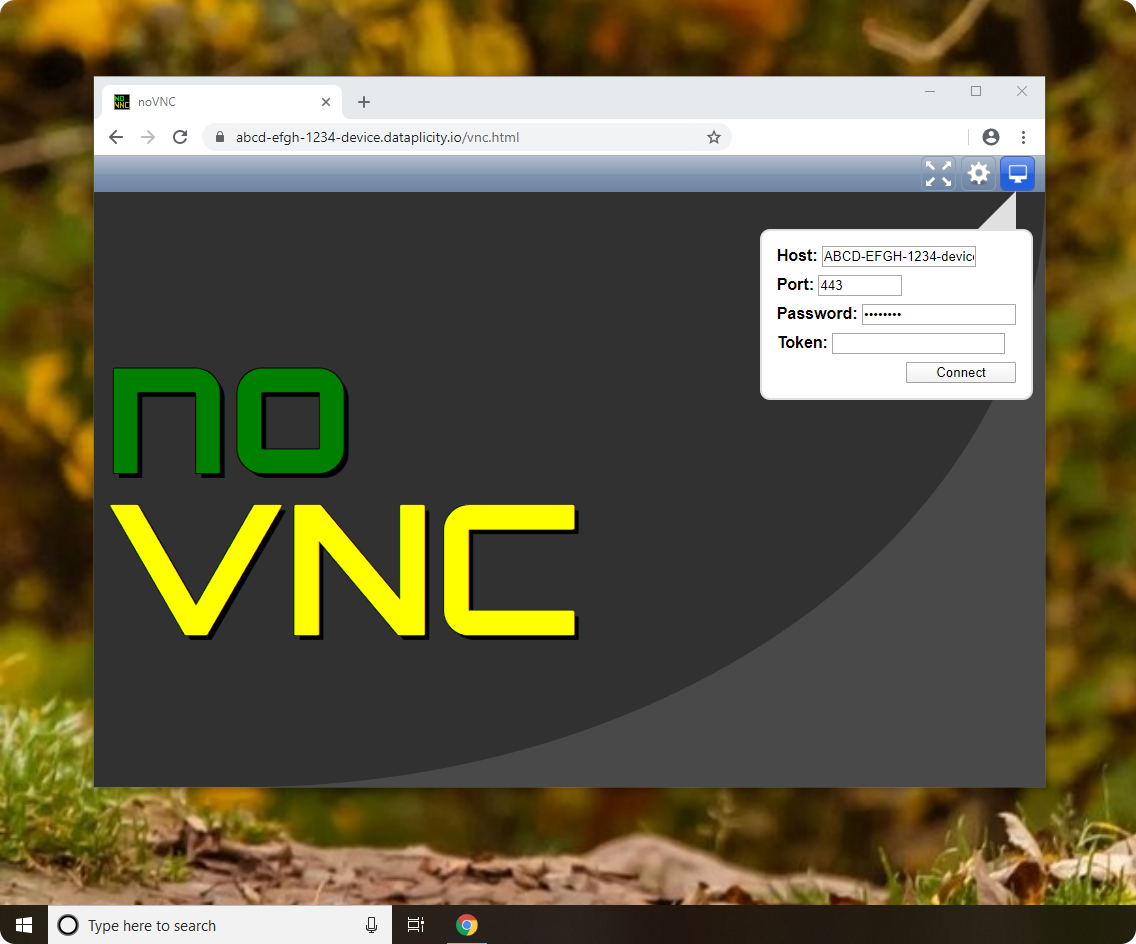
VNC - Visual access to your Pi remotely
While SSH is fantastic for command-line work, sometimes you just need to see your Raspberry Pi's graphical desktop, just as if you were sitting right in front of it with a monitor, keyboard, and mouse. That's where VNC comes in handy. VNC stands for Virtual Network Computing, and it essentially sends your Pi's screen display over the network to your other device. It's like having a window into your Pi's visual world, which is, you know, pretty convenient for certain tasks.
Using VNC means you can open applications, drag and drop files, browse the web, or do anything else you would normally do on the Pi's desktop, all from a distance. It's particularly useful if you're working on projects that involve a graphical interface, like setting up a media center, designing something visually, or even just showing off what your Pi can do to someone else without them needing to be there. So, it really extends the reach of your Pi's full capabilities, which is, frankly, a joy to use.
Similar to SSH, you'll need to enable VNC on your Raspberry Pi first. The Raspberry Pi OS often comes with a VNC server program already installed or easily added. Once that's running, it waits for a VNC viewer program on your other device to connect. This viewer then displays what your Pi is showing on its screen. It's a relatively simple setup, and once it's working, it feels very natural, almost like you're not even connecting remotely, which is, in some respects, the goal.
Here are some steps to get VNC set up:
- On your Raspberry Pi:
- Open the terminal program.
- Type
sudo raspi-configand press Enter. - Go to 'Interface Options'.
- Select 'VNC' and choose 'Yes' to enable it.
- If VNC Server isn't already there, it might prompt you to install it. Let it do that.
- Reboot your Pi if it asks you to, which, of course, helps apply the changes properly.
- From another computer (like your laptop or even a phone):
- Download and install a VNC Viewer program. RealVNC Viewer is a popular and free choice.
- Open the VNC Viewer.
- Enter your Raspberry Pi's network address (the same IP address you used for SSH).
- You'll likely be asked for your Pi's username and password.
- After a moment, you should see your Raspberry Pi's desktop appear on your screen, which, honestly, is quite a sight to behold when it works for the first time!
Are there other ways to access your Pi remotely?
While SSH and VNC are probably the most common and direct ways to get to your Raspberry Pi from a distance, they aren't the only options available to you. Depending on what you're trying to achieve, or how much control you need, there are other methods that might fit your situation a bit better. Some of these involve setting up more complex network configurations, while others use services that simplify the connection process, which, you know, offers a lot of choice.
The choice of method often comes down to a balance between ease of setup, the level of security you need, and whether you want to see the graphical desktop or just use text commands. For example, if you're frequently connecting from different places and don't want to worry about your home network's specific settings, a cloud-based service might be a good fit. If you need the absolute safest connection for sensitive projects, setting up a private network link might be more appropriate, which, in some respects, gives you ultimate peace of mind.
Exploring these other ways can sometimes feel like stepping into a slightly more involved area of computer networking, but they often provide extra benefits or solve particular problems that the simpler methods don't address as well. It's all about finding the right tool for the job, and knowing what else is out there can help you make a more informed decision for your specific Raspberry Pi setup. So, let's look at a couple of these alternative approaches, which, apparently, many people find very useful.
VPNs - Creating a private link to access your Pi remotely
A Virtual Private Network, or VPN, is a way to create a secure, private connection over a public network, like the internet. Think of it as building your own personal, encrypted tunnel from your current location directly into your home network where your Raspberry Pi lives. Once you're connected through this tunnel, your remote device essentially becomes a part of your home network, making your Pi feel as if it's right there with you, which, you know, is pretty neat for privacy.
Setting up a VPN server on your Raspberry Pi can be a very effective way to access your Pi remotely, and also any other devices on your home network, with a high degree of safety. It means that all your communication with your home network is scrambled and protected, making it very difficult for anyone outside your private tunnel to snoop on your activities. This is a particularly strong option for those who are very concerned about privacy and security, as a matter of fact.
The process of setting up a VPN can be a little more involved than just enabling SSH or VNC, as it requires some network configuration and understanding of how VPNs work. However, there are many guides and tools available that simplify the process, such as Pi-hole or OpenVPN, which can be installed on your Raspberry Pi to turn it into a VPN server. Once it's running, you connect to it using a VPN client on your remote device, and then you can access your Pi using its local network address, just like you would if you were at home, which, honestly, feels quite powerful.
The main benefit of using a VPN is that it secures all traffic between your remote device and your home network, not just the connection to your Pi. This means you can browse the internet as if you were at home, accessing local network resources securely. It's a comprehensive solution for remote access and overall network safety, giving you a lot of control over your data, which, in some respects, is a huge plus for peace of mind.
Cloud services - Simple access for your Pi remotely
For those who prefer a simpler approach to getting to their Raspberry Pi from a distance, or who might find setting up direct network connections a bit much, cloud-based services offer a very user-friendly alternative. These services act as a middleman, helping your remote device and your Raspberry Pi find each other and connect without you needing to fuss with router settings or complex network configurations. It's almost like having a helpful assistant make the connection for you, which, you know, can save a lot of headaches.
Services like TeamViewer, AnyDesk, or even some dedicated Raspberry Pi remote access platforms,
Related Resources:

Detail Author:
- Name : German Swaniawski
- Username : rory.mraz
- Email : beau73@effertz.com
- Birthdate : 1986-01-29
- Address : 98229 Dejuan Ferry Connport, ND 11257-7795
- Phone : +1-430-751-3962
- Company : Beatty-Haag
- Job : Interaction Designer
- Bio : Illum et architecto quam impedit amet. Sit ducimus quibusdam in non corrupti exercitationem atque. Ut sed voluptas voluptates.
Socials
tiktok:
- url : https://tiktok.com/@jermaine_mante
- username : jermaine_mante
- bio : Enim officiis iusto voluptates occaecati.
- followers : 6822
- following : 1537
instagram:
- url : https://instagram.com/jermaine_mante
- username : jermaine_mante
- bio : Nihil eius sunt fugiat est tenetur. Blanditiis veniam et dolorum vel culpa illum.
- followers : 1132
- following : 1388
linkedin:
- url : https://linkedin.com/in/jermainemante
- username : jermainemante
- bio : Quo sunt est dolorum qui eum qui est.
- followers : 280
- following : 1265
